
Quick Start Guide
Installation on 8, 8.1, 10 and 11
Airspy is a plug-and-play device and does not require any particular driver installation on Windows Vista, 7, 8, 8.1 and 10. You just plug Airspy and Windows will download and install the right driver for you.

There are exceptions where the original configuration of the PC does not allow the automatic installation of this class of devices. In such case, a driver should be installed manually with the following procedure:
- Download and unzip the WinUSB Compatibility Driver
- Open the device manager and select Airspy
- Select “Update Driver” then “Browse My Computer” to the inf file
Installation on Windows Server or Windows XP
Please don’t. They are not supported.
Using SDR#
Airspy was designed by the same people who developed the SDR# software so it’s the obvious choice for running Airspy and leverage all its powerful features.
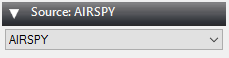
First, go to the download page and get a copy. Then run SDRSharp.exe and select the “AIRSPY” front-end:
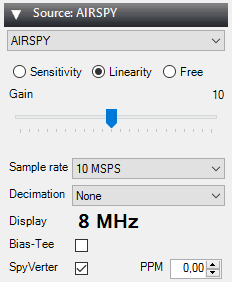
Then next step is the gain configuration. As depicted in this screen shot, there are many gain modes:
- Sensitivity
- Linearity
- Free (Custom)
The “Linearity” mode is the one you want to start with:
The following fine tuning procedure ensures you have the maximum SNR on the signal of interest while preserving the dynamic range:
- Start with the minimum gain
- Increase the gain until the natural noise floor rises by about 5dB
- Check that increasing the gain no longer increase SNR. If not, increase the gain by an extra notch. Repeat.
- Fine tune to maximize the SNR (the blue bar graph on the right)
In any case, you should make sure the RF noise floor just overrides the quantization noise floor of the ADC, but no more.
Using the SpyVerter
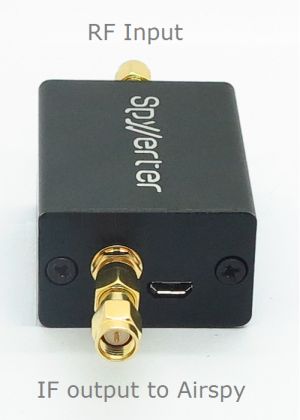
Airspy has an option to cover the HF bands: The SpyVerter. It is a low loss, high dynamic range, ruggedized up-converter based on a switching design – the same kind that is used in very high end HF rigs like the Elecraft K3. It offers HF coverage starting near DC up to 35MHz where it overlaps with the standard VHF-L of the Airspy alone. The default software settings allow Airspy to power the SpyVerter via the bias-tee functionality so no extra power supply is needed. Just connect the “IF Output” of the SpyVerter to the RF Input of the Airspy via the supplied barrel adapter.
It is recommended to use the Linearity gain mode in HF.
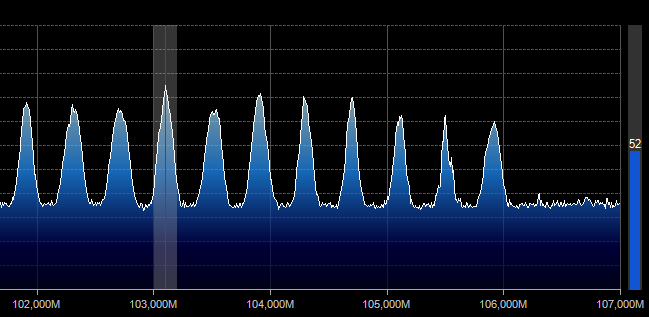
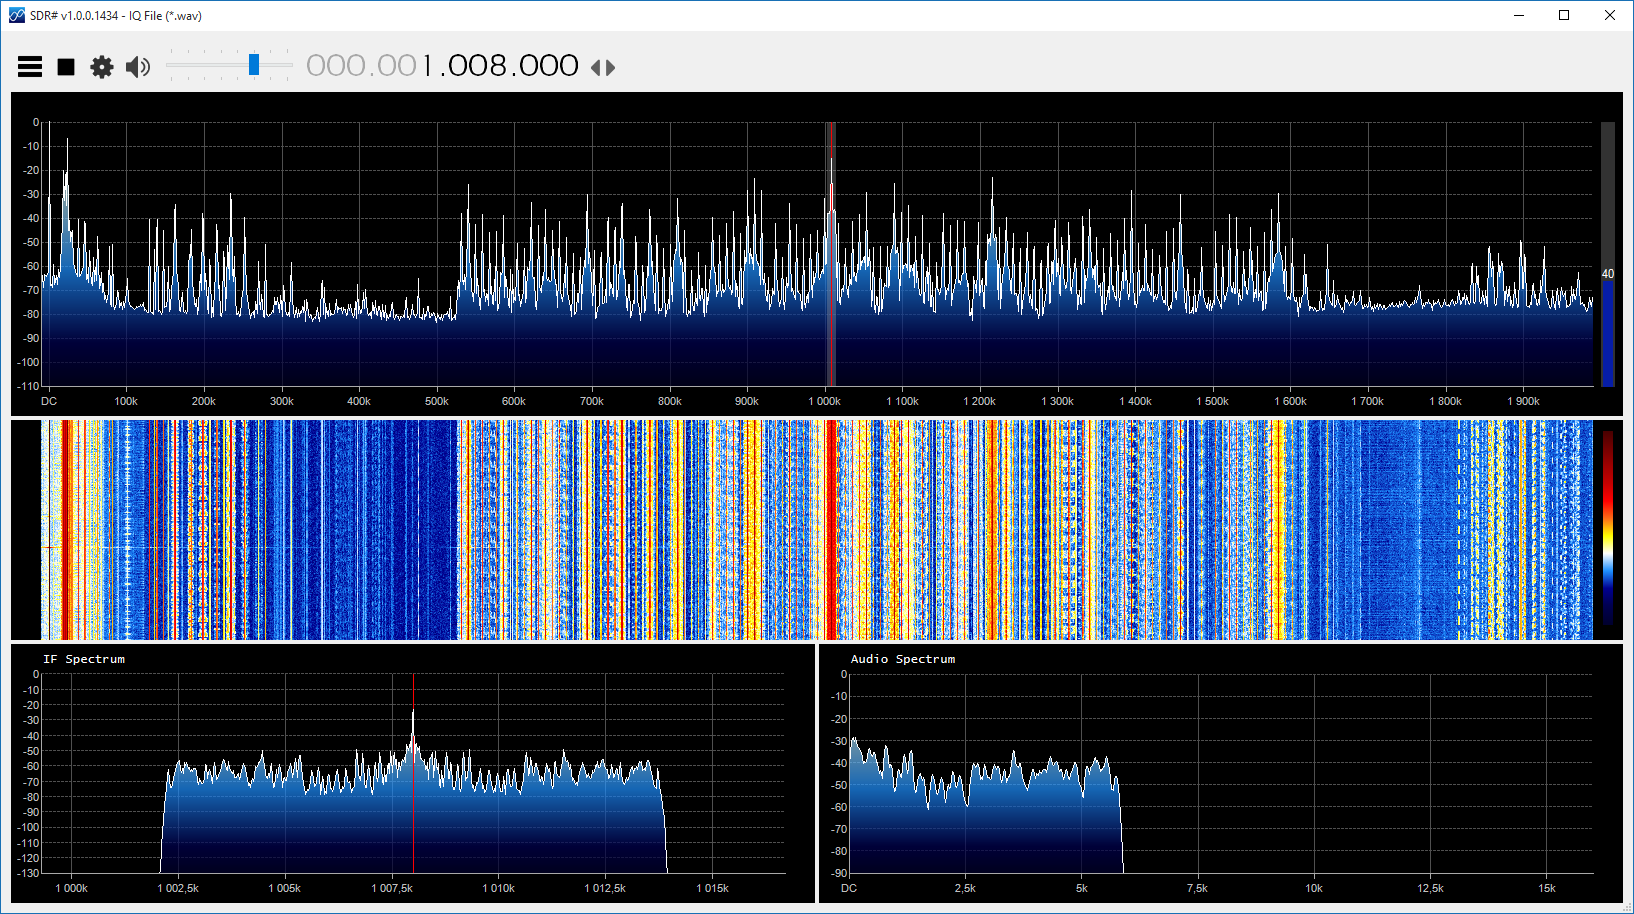
To verify your setup, plug a HF antenna and tune the AM broadcast band. You should get a view like this one:
Using the SPY Server for Remote SDR Operation
Presentation
Since revision 1553, we offer a new utility for the Airspy series to convert a Raspberry Pi, an Odroid, or just your regular Windows or Linux PC into a fully featured SDR server.
The SPY Server allows you to connect many SDR# “clients” to the same Airspy or RTL-SDR device over the network.
How does it work?
When only one client is connected, full control (center frequency, gain) is granted. When there are more than one client connected, the center frequency of the device and the RF gain are locked.
The default settings allow using the server in the LAN with optimal latency. The “Full IQ” option allows streaming the entire spectrum from the device to the SDR client (SDR#). If the network bandwidth is not sufficient to handle the traffic, uncheck the “Full IQ” option and the server will only stream the FFT display data and reduced IQ data that it necessary for decoding one VFO. The bandwidth savings allows usage over the Internet, but still requires high speed connection.
Configuration
The SPY Server comes with a standard configuration file that allows you using Airspy or RTL-SDR directly without an upconverter. If you have many devices in the same server, you can have multiple configuration files and pass the right one as parameter to the executable.
If the SpyVerter is used, the following parameters should be set in spyserver.config:
# Initial Center Frequency
#
initial_frequency = 7100000# Minimum Tunable Frequency
# Comment if using the device default
#
minimum_frequency = 0# Maximum Tunable Frequency
# Comment if using the device default
#
maximum_frequency = 35000000# Converter Offset
# Set to -120000000 to enable the SpyVerter offset
converter_offset = -120000000# Bias-Tee
# For AirspyOne only – Useful for LNA’s and SpyVerter
enable_bias_tee = 1
Running on Windows
Edit the configuration file if necessary and double click on spyserver.exe.
Running on x86 Linux
First, make sure you are have the latest version of libairspy installed.
Extract “spyserver_linux_x86” and “spyserver.config” from the standard zip, chmod and run.
$ unzip sdrsharp-86.zip
$ chmod a+x spyserver_linux_x86
$ ./spyserver_linux_x86 spyserver.config
Running on ARM Linux (Raspberry Pi or Odroid)
First, make sure you are have the latest version of libairspy installed.
Download and extract the standard ARM package and run.
wget http://airspy.com/downloads/spyserver-arm32.tgz
tar xzf spyserver-arm32.tgz
./spyserver spyserver.config
You can also use the automated installation script by Rodrigo Pérez which will do everything for you with a single command:
wget -qO - http://airspy.com/downloads/install-spyserver-rpi.sh | sudo bash
Linux Troubleshooting
What could go wrong in the Linux world? Well, many things (see the GPL sections 15 and 16). Here’s a list of the most obvious ones people reported so far:
- The program runs, but cannot acquire the device: The user mode driver is probaby not up to date. Try compiling the libairspy/libairspyhf from source.
- Sometimes using sudo makes things just magically work.
- “`GLIBCXX_3.4.21′ not found” => Try installing GCC 5
Using the ADSB decoder in embedded ARM boards
Prerequisite
You need firmware version 1.0 rc7 or newer to use Airspy as an ADSB receiver. Get the latest update from here:
https://github.com/airspy/firmware/releases
READ the instructions before doing anything.
Raspberry Pi 3 Performance Tuning
The latest Raspbian distros come with a new default CPU governor that is not suitable for sustained high performance operation. The CPU will start at a very high frequency (1200MHz), get very hot, then throttle back to a very low frequency (600 MHz). The governor will keep swinging back and forth between these two extremes and the USB controller will drop whole packets, which could affect both the number of decodes and the MLAT timing.
The following settings will force the “performance” governor at a much more acceptable CPU frequency for sustained operation without causing excessive heat and without sacrificing the performance of the decodes.
If very high MLAT reliability is required, the following switche should be applied to the decoder:
sudo /home/pi/airspy_adsb -l 30005:beast -x -m 12
This will run all the decoding in one core using 5 signal phases instead of 10, which requires half of the CPU usage, while still being very accurate for MLAT.
Additionally, we recommend to put these lines in /etc/rc.local :
# /!\ RPi3 Only! /!\
echo performance > /sys/devices/system/cpu/cpu0/cpufreq/scaling_governor
echo performance > /sys/devices/system/cpu/cpu1/cpufreq/scaling_governor
echo performance > /sys/devices/system/cpu/cpu2/cpufreq/scaling_governor
echo performance > /sys/devices/system/cpu/cpu3/cpufreq/scaling_governor
Then append these lines to /boot/config.txt :
# /!\ RPi3 Only! /!\
force_turbo=1
arm_freq=800
Lastly, you can also disable the “FIQ Fix” that limits the number of USB interrupts. Less USB interrupts will create more latency when polling the samples out of the USB hardware with the risk of missing more buffers.
To disable the “FIQ Fix”, you can add the following parameter to the line in /boot/cmdline.txt :
dwc_otg.fiq_fix_enable=0
Standard setup (non FlightAware)
The whole process for setting up a high performance ADSB receiver has been simplified. For the Raspberry Pi 2 or 3, Odroid or Pine64 boards, you can use the following commands:
mkdir airspy
cd airspy
wget http://airspy.com/downloads/airspy_adsb-linux-arm.tgz
tar xzf airspy_adsb-linux-arm.tgz
sudo ./airspy_adsb -l 30005:beast -l 47806:asavr -p -m 12 -x &
FlightAware Integration
The easiest way to integrate Airspy into an existing FlightAware PiAware is described here.
If you don’t need all the details, you can just use this neat installation script by FlightAware member @wiedehopf. This script works for FlightAware SD Card images:
sudo bash -c "$(wget -O - https://raw.githubusercontent.com/wiedehopf/airspy-conf/master/install.sh)"
Operation
Once you have your decoder up and running, you can use any aircraft tracking software that supports the Beast or AVR formats.
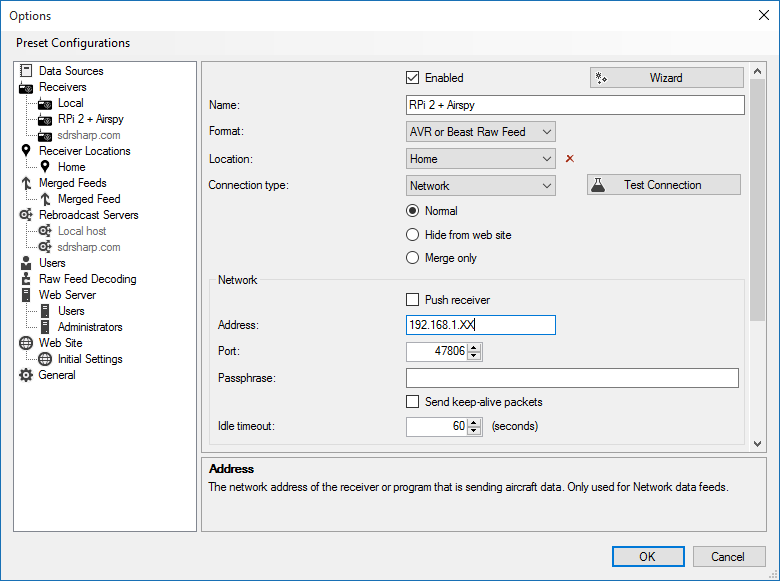
Virtual Radar Sever
Here’s an example configuration for Virtual Radar Server:
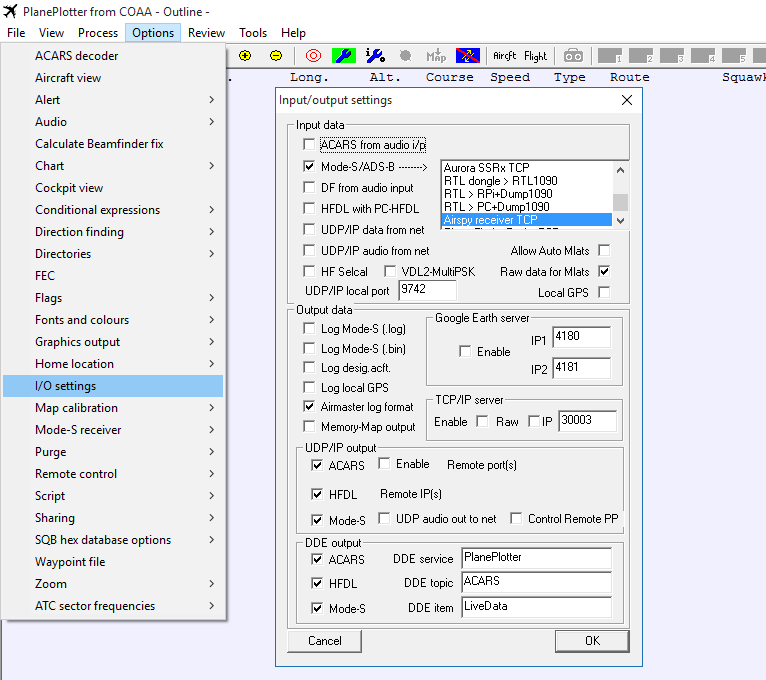
Plane Plotter
For Plane Plotter, you can use this configuration:

The effects of oversampling and decimation
The decimation option allows you to trade some of the instantaneous bandwidth to get more bit resolution, and hence, lower quantization noise. The basic rule of thumb is 3dB every time you divide the bandwidth by two. So, decimation by two gives you 3dB, decimation by 4 gives you 6dB, by 8 gives 9dB and so on.
To further leverage the effects of the decimation, you can also readjust the gain using the same procedure described above. A slight saturation of the ADC gives you more SNR after decimation. So basically, when you use a higher decimation rate, adjust for higher gain and vice versa.
The Bias-Tee option: 4.5v @ 50mA
In some cases, one may need a very low noise figure. For example, some satellite communication systems require a front end with a noise figure as low as 0.2dB. In such case, using an external preamplifier near the antenna system can improve the overall operation. The Bias-Tee option allows powering such a preamplifier directly from Airspy by injecting DC at 4.5v. Of course, such a preamp should have its own biasing system to extract the DC and inject the amplified RF signals. The current budget is limited to 50mA, so that’s enough to run most of the modern MMICs.
Another use case one can imagine is to switch between antennas using that bias signal or even power down-converters for higher bands OR up-converters for LF and HF, like the SpyVerter mentioned above.
Calibration
Starting from June 2016, Airspy R2 units are calibrated in the factory up to ~0.05 PPM. This calibration is written in a different memory location than the one used for the firmware, so upgrading the firmware won’t delete it unless you do it by yourself.
The procedure to recalibrate a unit is as follows:
- Open the calibration tool (AirspyCalibrate.exe),
- Clear the correction,
- Reset the device (unplug/plug again),
- Inject a known and accurate signal,
- Set its exact frequency in the tool,
- Click on “Calibrate”,
- Reset the device.
Note that this procedure requires firmware version 1.0-RC9 or better.
Troubleshooting PC performance problems
We created a set of command line utilities to help troubleshooting the performance problems.
- Download the latest release of the tools package
- Open a console (cmd.exe) and run
airspy_rx -r NUL -t 0 - Leave it running for 30 seconds, then Ctrl+C
- If the average throughput is below 10.0 MSPS then either your USB controller has problems or you CPU can’t process the data. Possible solutions:
- Use another USB port
- Update your USB drivers (Prefer OEM drivers to generic ones)
- Check your anti-virus or any other CPU heavy task
- See also our Wiki: https://github.com/airspy/host/wiki/Troubleshooting (users can update it with their configuration/solutions)
Known issues
- Slow computers won’t be able to run Airspy at 10MSPS without dropping samples. That’s a lot of data to process in real time. Make sure you run Airspy in a modern machine as described in the minimum hardware requirements.
- In a fresh Windows 7/8/10 installation, Windows Update will grab the generic Microsoft USB drivers. These may not be optimal for high throughput operation and it is advised to update them with the latest version from your OEM. For example, the latest Intel USB 3.0 drivers turned the streaming on some PCs from choppy to perfectly smooth.
- Some old generation USB 3.0 controllers are not compatible with USB 2.0 devices at high speed. Changing the USB port can be sufficient to solve this problem. And again, make sure you run Airspy in a modern machine as described in the minimum hardware requirements.
- In some PCs, the experimental 2.5MSPS mode is vulnerable to USB noise. This will be improved with further firmware updates. The recommended method to get lower sample rates is to use some decimation with the 10MSPS stream.
- USB Hubs won’t work at the full sampling rate. Just don’t use them.
- Beware of overheating. Keep your unit in open air environment while running.
That’s all folks!